Here’s a series I’ve wanted to write for a long time. Like many other nail addicts, I’m a bit sick of people assuming that:
- the only reason our nails look good is an ungodly amount of Photoshop; and/or
- it takes a lot of skill or special equipment to get nice nails.
Neither of these is true. There are tons of nifty little tricks that you can use to make polishing a breeze. Of course, practice still helps, but just knowing a few things helps. A LOT.
The title of this series isn’t entirely accurate. The techniques aren’t secrets, and it’s not just bloggers who know them – they’re used by IG nail artists, and general members of the nail community (it’s just less clumsy to use the term “nail bloggers”, but I’m including all the awesome IG artists and nail lovers I’ve met over the years in that label – yoohoo Aussie Nails ladies!). But for some reason they haven’t filtered out into the wider online beauty community yet. They don’t even seem to be common knowledge in many of the nail interest groups I’ve come across.
Frequently a newbie will stumble into one of the nail communities I’m in, and ask about these. Many of us will instinctively clutch our pearls, but we realise it’s entirely unfair to expect everyone to know all the ins and outs of cleaning up their cuticles or removing glitter. I didn’t know most of these in the first 6 months of my blogging life. I’m sure there are widely known tricks I haven’t heard of too!
So this series is my small contribution to helping everyone get the manicure of their dreams. I hope it helps some of you, and maybe even the experienced amongst you will discover something new – happy polishing!
You probably need a top coat
Ideally, every polish is designed to be able to be worn without top coat. Some are designed to have their own special finish (textures, mattes), but by and large, the standard glossy polish will be improved with the addition of a top coat.
What improvements?
- Faster drying
- Chip resistance
- Glossier finish (neon polishes and no-name brands frequently dry matte)
- Flattening out brush strokes
- Smoother finish (useful for smoothing out gritty glitter polishes, as well as transforming textured polishes into regular ones)
- Different finish (matte, satin)
[Side note: TOP COAT THAT MAKES YOUR POLISH DRY FASTER, EXISTS. It doesn’t mean you have to wait longer for that additional layer to dry – it speeds up the drying of the layers underneath. I go to sleep half an hour after I apply a quick dry top coat, and my nails are undented and dry when I wake up. Quick dry drops exist too, but quick dry top coats have other advantages too (see below).]
There’s no such thing as “the best top coat”
It would be nice if there were a top coat which ticked all the boxes, but at the moment, there is none that I know of, so the “best” top coat really depends on your needs.
I know it seems like I’m contradicting myself when I say this, since I wrote this post on Lacquerheads, but the poll would have been more accurately titled, “What’s the best top coat, according to Aussie ladies who fucking love polish, paint their nails four times a week and frequently have children, pets, or both?”
That’s why Seche Vite won by a mile – when you have a mischievous toddler or impulsive cat, or you’re trying to cram your obsessive polishing around work and a reasonable amount of sleep, you need a top coat that dries fast and lets you smooth out dents (this is one of the biggest pros if you don’t have time to wait for polish to dry – you can massage out dents in the Seche-Vited layer cake). It’s also super shiny and photogenic! And if you’re changing your polish every few days, longevity isn’t a must – Seche Vite is a notorious chip monster, and can shrink from the free edge, which combined with tip wear can look raggedy after a few days.
The most appropriate top coat also depends on your climate – moisture can fog up top coat, so if you live somewhere damp, fog resistance might be a priority. It can also depend on your base coat – some top coats don’t play nice with certain bases, and your choice of base will depend a lot on your body chemistry and needs (strengthening, stain resistance, easy glitter removal, ridge filling – more on that later).
Here are some popular top coats for various purposes:
Quick dry, dent-minimising: Seche Vite, Poshe, Cult Nails Wicked Fast, HK Girl Glisten & Glow
Chip resistant: Sally Hansen Insta Dri, gel top coat
Glitter-smoothing: Essence Gel Look, old gloopy Seche Vite
Matte and satin: Essie Matte About You, OPI Matte Top Coat (if you’re being budget conscious, you can also make your own matte top coat)
Many indie brands also sell top coat. I’m currently using (and loving) Quick! Gloss Me Up! from Peita’s Polish.
But wait… there’s technique involved!
So now you’ve chosen a top coat… but that doesn’t ensure that your nails are going to be shiny chip-free pretties. There are a few extra things to keep in mind…
Don’t wait for your polish to completely dry
Here’s something else they don’t usually tell you on the back of the bottle – you don’t need to wait for your polish to dry before putting on top coat. You don’t even necessarily need it to be touch dry. Seche Vite and other quick-dry top coats generally work better if you use them over polish that’s about 50% dry, and tend to peel badly if you wait too long to apply them. 2-5 minutes is as long as I’d wait.
(The major exception to this is if you’re using a gel top coat over regular polish for serious longevity – that generally works best if you let the polish dry for as long as possible.)
Drag-free goodness
When I first started painting my nails, I tended to always get either too much polish on my brush (indescribable messiness) or too little (brush strokes, dragging away the bottom layers of polish). With top coat, however, it’s almost always better to err on the side of too much, especially if you’re leaving your lower layers pretty wet.
You want there to be enough top coat to form a fat drop under the brush, but not so much that it’s dripping. About this much (though I usually go with more):
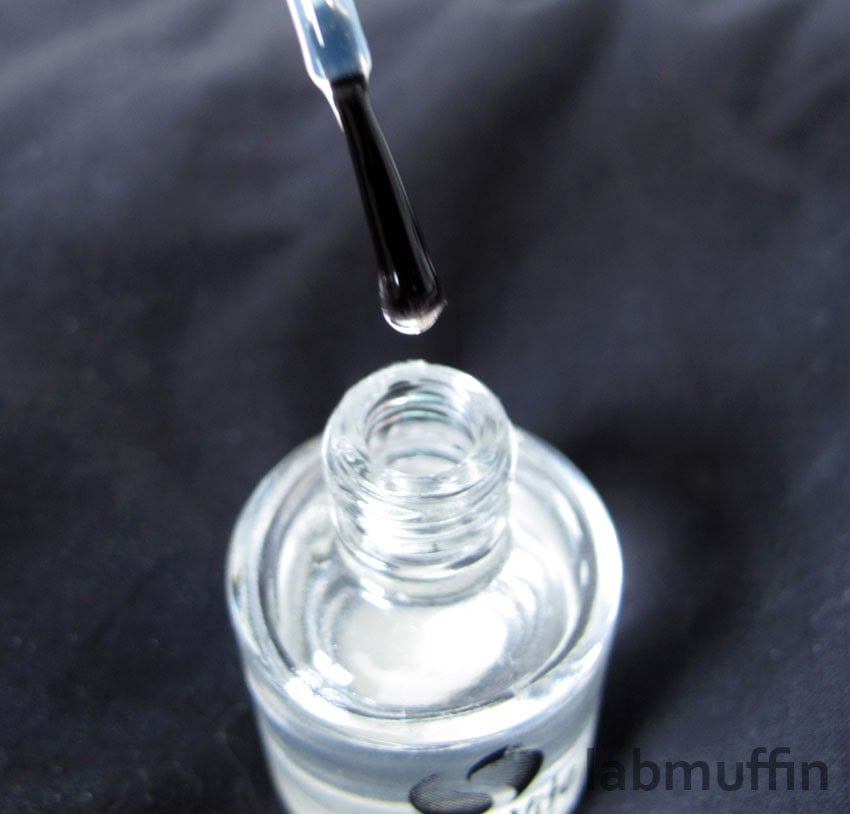
In a pretty full bottle of Seche Vite, I’d get this amount by dipping the brush almost completely into the bottle and wiping the side off once. The reason you want a good amount of top coat is that it acts as a sort of cushion beneath the stiff brush bristles, so you don’t drag a bare hole in the underlying polish.
Another technique that helps prevent your top coat from dragging a hole in your polish is to angle the brush like so (at 30-45 degrees, for those of you who are mathematically inclined):
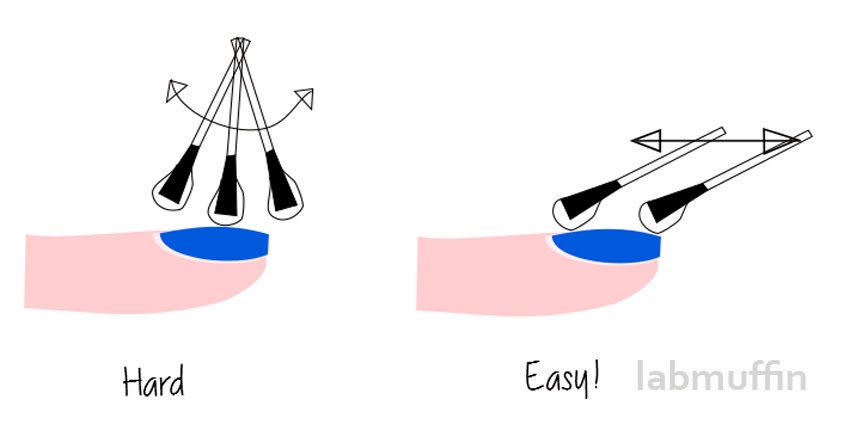
It also helps if you stroke the brush across while maintaining that angle by moving your whole hand. There are plenty of people who can apply top coat perfectly well with a vertical brush. I kind of hate those people.
Wrap those damn tips!
Here’s something else they don’t tell you on the back of the bottle – you should wrap your tips when applying a top coat. What does that mean? Make sure your top coat extends past the top surface of your nail, past the edge to the underside. Even better, your polish and base coat (more on those later) should too. This stops shrinkage, which is when the top coat pulls the polish back from the edge as it dries, exposing the bare nail underneath or leaving an unintentional French tip. It also slows down tipwear and chipping.
Some people do it after painting the main part of their nail, some people do it as they paint. I prefer to do it before, so I can make sure I have complete coverage, and smooth off the bump at the edge.
This is what I do, shown with coloured polish for clarity:

First, I run the brush along the edge to make sure it’s all covered, then I paint the rest of the nail like normal. Voilà, wrapped edge and no bump!
Top coat can save your mani
Top coat is just a little bit magic. Does your polish have the texture of chewed up gum? (You should’ve thinned it first, but more on that in another post.) Your top coat can fix that. Observe this lumpy mess:
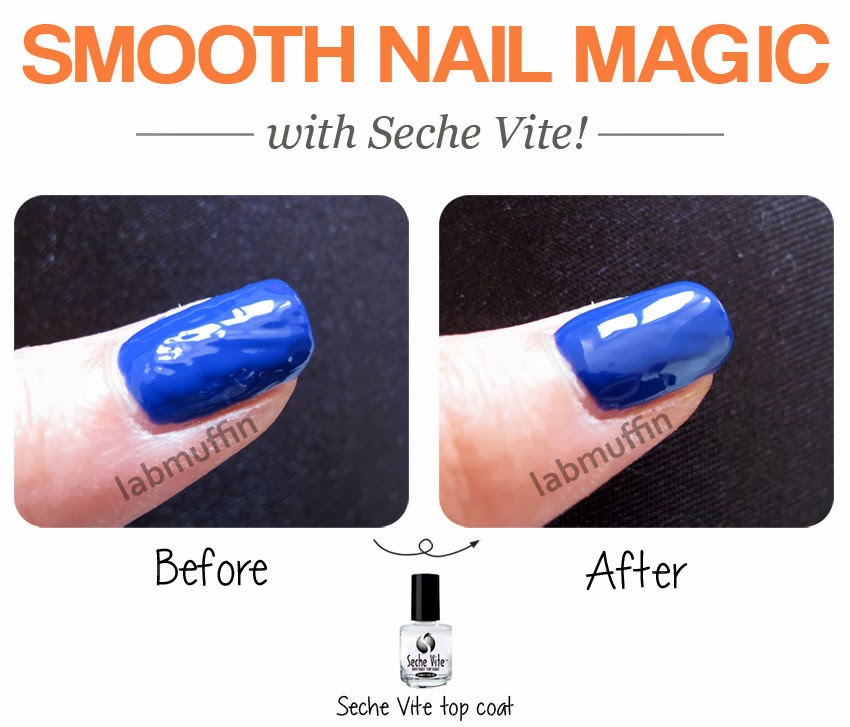
Seche Vite and many other top coats can iron that mess out!
Another massive pro of Seche Vite and other quick dry top coats, as I mentioned before, is how they let you save bumps and dents in your mani. Here’s a demo:
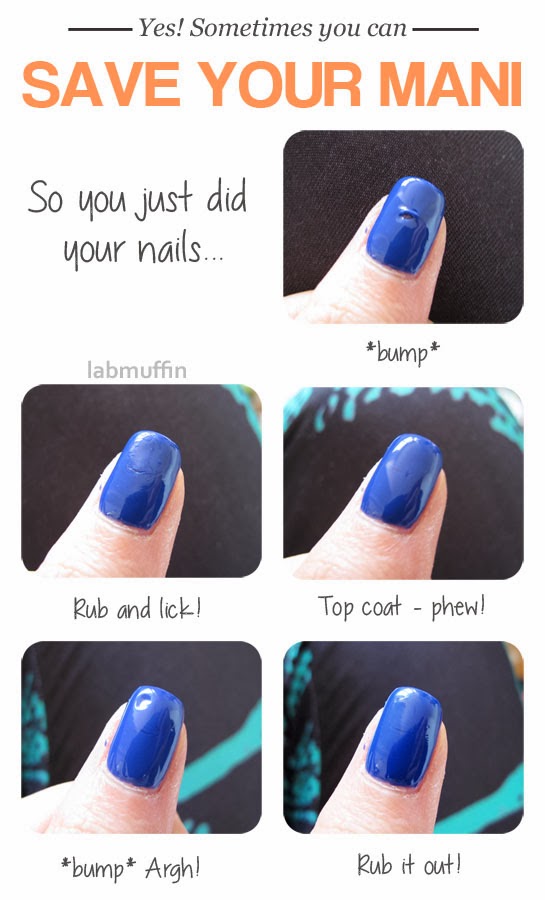
You can barely see the damage after it’s dried! These tricks – rubbing gently to smooth out a bump, licking (yes, that’s another tip – if it’s too gross for you, try licking your finger and smoothing it over the bump, and if that’s still too gross, try water, and if you’re still shuddering, just give up now) – can work with any polish, but you’re 1000 times less likely to make an even bigger mess if you’re using a quick dry top coat.
There’s a catch
Quick dry top coats sound amazing… but they come with a few catches! As well as being chip-prone, we have this scourge of quick-dry-kind:
THE DREADED SHRINKAGE.

See that weird two-layer effect at the edge of the nail? That’s where the Seche Vite didn’t quite cover the polish underneath, and as it dried it pulled the polish away from the sides. To stop this from happening, you need to make sure the top coat covers all of the polish, which can be difficult since it’s transparent.
What have I missed on top coats? Add your tips in the comments below!
Reader suggestions
rachlovespenguins: Smooth out manis that dried wrinkled with a super-smooth buffing file. Works on fogged up top coat too!
Nelly S: Two additional top coats, popular in the US – INM Out the Door (quick dry) and Glitter Food (glitter-smoothing).
Next time… let’s get serious about nail care and base coats.
Nail Blogger Secrets for Pretty Nails Series
Part 1: Top coat the mother
Part 2: Prep that base
Part 3: Clean-up is your sneaky BFF
Part 4: Glitter isn’t normal polish
Part 5: Nail addiction on the cheap
This post contains affiliate links – if you decide to click through and support Lab Muffin financially, thank you! For more information, see Disclosure Policy.


Actually, I’ve been wondering why you don’t put nail polish all the way down to the bottom of the fingernail?
It’s personal preference mainly, and I think the gap looks much bigger in the closeup blog photos than in real life (for instance, my current mani is three days old and the gap is less than a millimetre, and my nails grow pretty fast). I prefer a small gap for a few reasons – the main one is so I have space for the top coat to cover the whole of the polish and avoid the shrinkage line, without having to get polish on the living skin. I also like to have a very flat, smooth finish on the whole nail, and I find that if I get polish or TC on the skin, it tends to lift at the cuticle when it dries and catch on clothing. It also makes cuticle flooding less likely, which means I don’t end up with pigment on my cuticles, especially if I’m doing a long swatch sesh.
Isn’t it also true that if you leave polish on your live cuticle, it’s more likely to get infected?
I’m not sure about that, but I wouldn’t be surprised! It would make the skin stiffer and less supple, so more prone to tearing.
It is always good to re-learn these types of things. I love my Seche top coat. On a side not though, do NOT ever accidently pour Seche top coat into your Seche base coat bottle. Unless you are into the whole cool science experiment it will make you cry. Thanks for the tips. I look forward to more.
Haha! I actually learned about the difference in formulation between base and top coat today. Definitely not two products you want to mix up!
Oooh, what happens??
Yes, do tell! If nobody explains I’m going to be forced to try it just for the experiment factor. lol
okay this is sure an interesting topic! 😀 Looking forward to hear about it. By the way, does that mean those polishes that says they are “2 in 1 – topcoat basecoat thing” are not recommended?
LOL. You all crack me up. I was using my refill bottle of seche and I accidentally refilled a base coat bottle that was about half full. It made a cloudy ball of polish in the middle of the bottle. Fun to play with but a huge waste. By the next day the stuff in the bottle was almost solid. I was very sad. Don’t try it unless you just have money to burn.
Big cloudy ball of sadness :'(
Lacqueerisa Says – Top coat/base coats are really lame, and only really appropriate if you’re broke or have no space to store an extra bottle. The end! 😛
Seriously though, they try to do two pretty-much-opposite things and end up being good at neither. It’s like trying to run and sing at the same time.
HK Girl top coat by Glisten and Glow is the same and Seche except I have never had it shrink my mani. $6.96 USD. Amazing. Thanks for this series!
I’ve heard good things about it, but it’s not easy to get a hold of in Australia! It’s on my to-try list after my SV refill bottle runs out.
This is so great! My friends always ask me how I keep my nails so nice, and it’s mainly due to a collection of little tips about nail care that I’ve accumulated over the past year from bloggers and other nail enthusiasts. I already knew most of the tips in this post, but it’ll be great for directing to my less nail-savvy friends. I can’t wait for the next post! =)
Thanks! That’s exactly the sort of people I want to help, so they don’t have to learn everything the hard way like I did 🙂
Great article!.Will have to dry that dent fixing next time i have one. I always end up with my fingerprint embedded in mani. I haven’t tried seche vite as yet, where do most people buy it from?
You can find it in most salon supply stores, and through eBay (enchantedbeautyspot and beautyzone2007 are two popular sellers).
Do you have much trouble getting it from international sellers? I’m in Melbourne and I’ve tried to order polish before and had it go missing so I was wondering whether you get the majority of your packages from these sellers? There’s one salon here I know of that sells it, but for $23 – ouch!
If your nice cushy layer of topcoat still dries with some small dents (slight sheet marks, etc) you can often smooth them out the next morning by using just the final “high gloss” side of a buffing block. Only the glossing side! You need to apply a decent amount of pressure and it usually sounds rather awkward and squeaky, but most of the time it works for me. This technique also works fairly well for shining up small areas where my topcoat has dried with that lovely (annoying) foggy look. I’m never quite sure what causes such patchy fogging, though reading that it could be the weather/humidity does make sense now that I think about it.
Nice! I haven’t heard that tip, will add it to the article. Thank you!
Amazing post! Definitely referencing to this from time to time 😀
Cheers! 🙂
Awesome post 🙂 SV will also do the dreaded shrinkage if it’s gone gloopy, even if you’re extra careful while top coating :/ I have such a love/hate relationship with it at the moment! HK girl is fantastic, but not as thick so not always good over glitter.
I need to get my hands on some HK Girl soon! Where do you get yours?
Celestial Cosmetics and Femme Fatale stock it 😉
I have a brand new bottle of SV and I have the dreaded shrinkage on most of my nails. I thought I was wrapping the whole nail carefully; but I’ll try again today. Interestingly, it didn’t shrink my two accent nails which are Milani polish (very thin polish) but all of the Orly nails (thicker layers) shrank.
Oh yes, it definitely does it more on thicker polish! SV kind of grabs the lower layers and bunches them up, so if the polish is thick there’s more cushion for the pushin’.
I got my first bottle from Celestial Cosmetics, and have since bought a bigger refill bottle from the Glisten and Glow website 🙂
You’ve forgotten another super popular topcoat – INM Out the door. And for glitter polishes the are ‘Glitter Food’ topcoats.
Thanks! I’ll add those – they’re hard to get in Australia so I haven’t personally tried them, but I’ve heard good things!
I love this post like a fat kid loves cupcakes. ^^
Thanks! Although I would challenge anyone of any size to love cupcakes as much as I do. I would cut people up for cupcakes.
I also recommend Rica Glossy Glam topcoat. Really good wear time, 3 Free for those who worry about that sort of thing, super shiny and smooths most glitters in 2 coats. It’s my Go To Topcoat at the mo 🙂
I’ve heard mixed things about it – it seems like if it works, it’s amazing, but if it doesn’t, it’s a complete flop? It’s a mysterious one!
This is just soooo helpful, and I want to thank you for sharing your knowledge with us all. There is one little thing I noticed though, and only because I read your section on clean-up before this section, is the fact that in this section you say to add the top coat before the polish fully dries, but in the section on clean up you say that the best time to clean up is before you add the top coat. Don’t these two hints contradict themselves? What is the best way to go, please?
It takes a while for polish to fully dry (15 minutes or more), and clean-up shouldn’t take anywhere near as long 🙂
That’s exactly what I do… base coat/let dry/1st coat/let semi dry/2-nd coat/clean up (2-3 min)/top coat
I recently discovered a new-to-me way of top-coating that is pretty much assured not to smear stamping/other art & can avoid shrinkage, too. Use a non quick dry first, then a quick dry over that. Also, to ensure you cover all the polish, I reccommend getting careless, and slapping tc all over your cuticles and side wall 😀 No really. Then swipe off the excess w. your clean-up brush or, easier still, a dotting tool. This way, you don’t get that lifting or any shrinkage 🙂
This is what I recently started doing too, and holy smokes, I’m on day 5 with barely any chips and very little shrinkage. When I used SV alone, I got a lot of shrinkage. But a regular top coat THEN SV… Different story.
Really surprised nobody mentioned (or at least, I didn’t see anyone mention) Sally Hansen Insta-Dri. I’ve tried Seche Vite, Poshe Quick Dry Top Coat, INM Out the Door, Malava Mavadry, and I always keep coming back to the Insta-Dri. Easy to get in Australia, too. Visit any KMart, Priceline, or chemist that sells Sally Hansen nail polishes.
I will note that a couple weeks ago, I accidentally used quick dry top coat as a base coat (it was Poshe; the bottles are exactly the same, though the caps are different, and I wasn’t paying enough attention). I had ridiculous bubbling in the polish, and it took forever to dry, even with a quick dry top coat and, when that wasn’t working, quick dry drops. It took me a while to work out what the heck was going on with it! So, yeah, don’t use top coat (especially not quick dry top coat) as a base coat. 😉
I do really like Insta-Dri in the red bottle, but I don’t count it as quick-dry – it’s not quite as bump-proof as SV and the rest. But it is SO GOOD at being chip-proof! It’s one of the hardest wearing top coats I own.
regarding your advice about wrapping the tips of your nails, do you also wrap the tips when you apply the topcoat? I usually use CND XPRESS SHELLAC or Seche Vite topcoats.
Yep! Otherwise I find that I get tipwear very quickly.
Thank you for the advice. I have found this blog to be ver helpful!
I’m begging you please try Dior Abricot Top Coat. This stuff is miracle in the bottle. I have a salon and I use it on my clients despite access to half price professional brands.
It’s like Seche but it doesn’t thicken up, the brush covers the nail in 2 even strokes and NO SHRINKING EVER!!!! Even if you slop it on with your left hand.
Unfortunately Dior is discontinuing this miracle and replacing it with their Gel Top Coat. This one thickens up and I haven’t had the urge to spend $28 on polish that I can use half bottle of.
This is awesome! I’ve gotten really lazy with doing my nails because it never seems to last very long and chips so quickly.
Thanks for sharing these handy tips!
I’m saving them to my Pinterest!
I’m so glad you found it handy! I’ve gotten very lazy recently too 🙁
i like to use a normal (ie SecheVite-esque) top coat right when i do my nails and 3-4 days later apply a gel top coat. this extends my mani’s life, makes my nails glossy again, and makes the mani process much less time consuming (yay!)
Do you know if you can apply another coat of seche vite to your manicure after a couple days to prolong the manicure? Or will that cause the manicure to lift from the nail?
I’ve found that it makes it lift. I’d recommend applying a chip resistant top coat instead!
I’m new to your blog and soooo glad I came across this post. I hate Seche Vite and always wondered it I was doing something wrong since it’s so highly considered in the nail blog community. But after reading this post, I realise that the exact things I hate about it, are the same things that you have highlighted… the awful chipping after a few days ( I don’t have time to change polish every two days) and the shrinkage (didn’t know there was a specific term for it). Thank you.
China Glaze quick dry top coat is equally annoying with the chipping, although it creates a nice glossy surface.
My recent love is the Orly Sec ‘N Dry. It’s not a super glossy topper, but there’s no shrinkage and it lasts almost a week without noticeable tip wear and no chips.
“DON’T WAIT FOR YOUR POLISH TO COMPLETELY DRY”
Never heard of this before. Will definitely try it out next time.
Great information, and liked the information about not letting the color coat not to dry before putting on the top coat (great advice)
Question: can i put on a second coat of top coat the next day?
Hey Michelle!! Thanks for those amazing tips, my nails always tend to have that unwished french tip so will definitely try the edge procedure 🙂
have a nice day
Barbara
So I bought this super fast drying top coat (brand name is “Out the Door”) and no matter what I do, there’s always parts of it on the nail that dry matte and not glossy. Is there any way to fix this without buying a whole new bottle? (I bought a pretty large bottle of it lol)
Thank you for sharing this