In the middle of teaching some high school students about the chemistry of soap-making, I realised that I really, really wanted to try making some soap myself and write about it here.
My write-up ended up being really long, so I’ve made it a two-parter – Installment 1 is all about the chemistry, and Installment 2 is about the actual procedure (which you can also do at home with equipment and chemicals from the supermarket!).

You don’t need to understand the chemistry behind soap making to make soap, but knowing the background does mean that you can play around with your recipes and solve any problems you run into with minimal trial-and-error and wastage!
It’s also very interesting from a scientific point of view.
Jump to section:
- What Is Soap?
- Making Soap – The Saponification Reaction
- Fats and Oils
- Strong Base
- Proportions
- Glycerin
- Summary
Before we can start with the nitty gritty of chemical reactions – what even is soap?
What Is Soap?
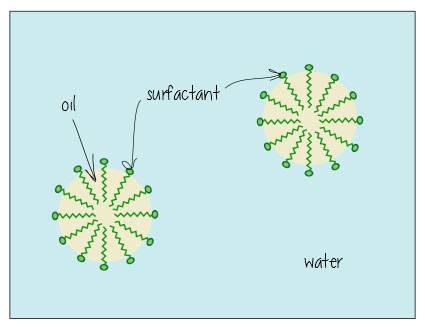
If you’ve been following me for a while, you’ll remember me mentioning chemicals called surfactants, such as in my guest post on chemophobia on The Toast, and in this face washing guide.
Surfactants are nifty molecules that dissolve in both water- and oil-based substances, meaning they can clean oil off surfaces, and keep mixtures of oil and water-based liquids happy together (think mayonnaise – without egg yolk acting as a surfactant keeping everything mixed, it’d just separate into vinagrette dressing).
Surfactants have a charged water-loving, hydrophilic “head”, and a neutral, oil-loving, lipophilic “tail”.

Here’s what it looks like when it’s dissolving oil in water (e.g. in your dirty bathwater, or keeping the fat dissolved in your milk) – the surfactants hang out in the interface between the oil and water, holding everything together.
Soaps look something like this:
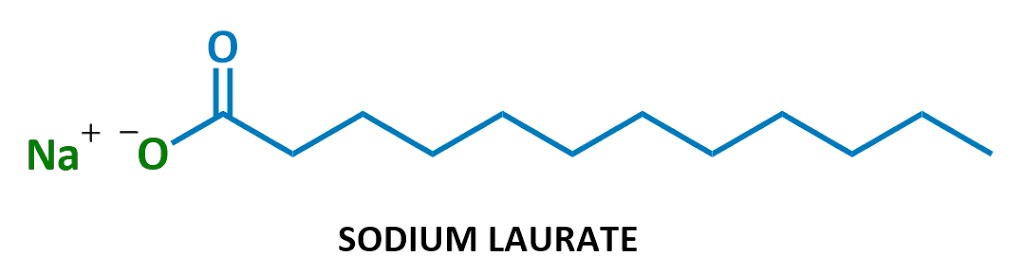
This particular soap molecule’s called sodium laurate. When it dissolves in water, the sodium (Na+ on the left) and the laurate (the rest of the diagram) split up. Here’s the laurate ion:
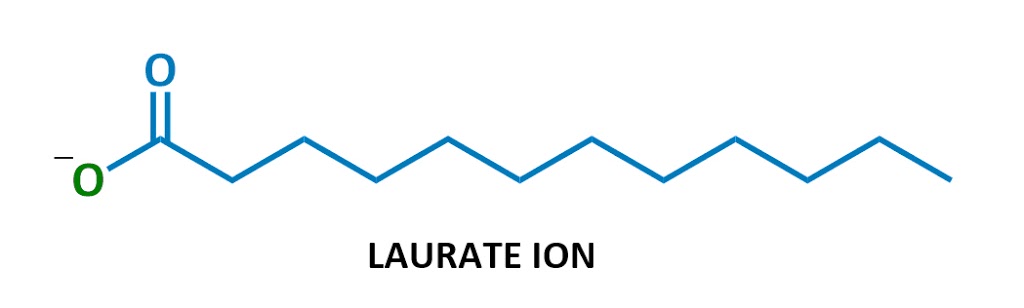
Looks familiar?

Yep, soaps are negatively charged surfactants!
They’re part of a class of chemicals called anionic surfactants (anionic = negatively charged), which includes the strongest cleaning agents. (Technically soaps are referred to as “salts of fatty acids” – I won’t use this terminology much but it’s here in case you ever need it.)
So, how do we get these useful things in our grubby little hands?
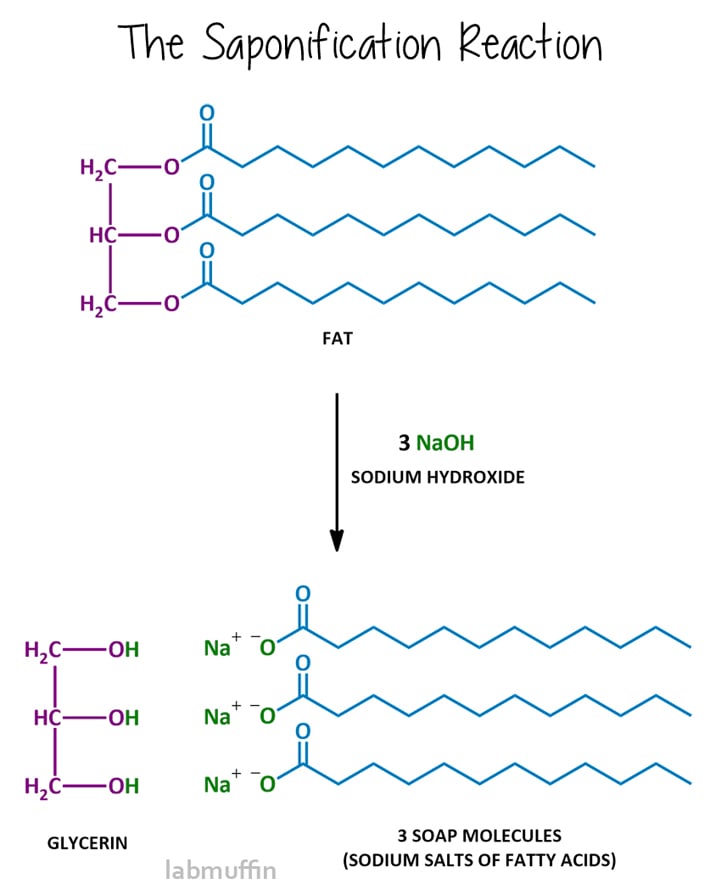
Making Soap – The Saponification Reaction
Soap is made from reacting a fat or oil (or a mixture) with a strong base (something with very high pH). The chemical structures of fats and oils generally look like this:
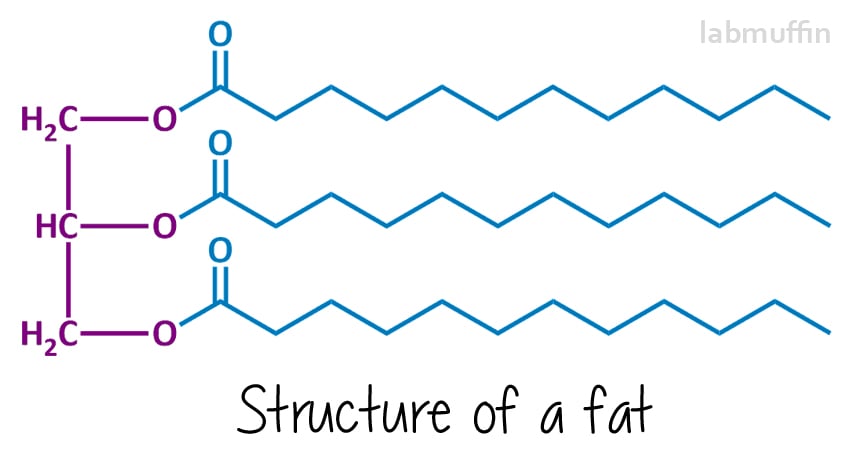
The left hand side (purple) is always the same – it’s based on a glycerin (aka glycerol) molecule. Each “O” represents an oxygen atom – there are 3 on glycerol, and these are chemically attached to 3 fatty acids (in blue, which will end up being the soap).
These can all be the same or different (in this drawing, I’ve drawn them all the same). Because there are three things and they’re joined to a glycerin molecule, fats and oils are called triglycerides.
The soapmaking reaction is called saponification, and after reacting, the mixture is said to be saponified. Saponification involves reacting the fat or oil with a strong base, usually sodium hydroxide (aka lye aka caustic soda), although you can also use potassium hydroxide (aka caustic potash).
This reaction breaks the triglyceride into the purple and blue parts, in other words, the glycerin and soap molecules.
Let’s have a closer look at each component of the reaction:
Fats and Oils
This is the most complicated and interesting part of the recipe. Different fats and oils can be used to make soaps with different properties. In fats and oils, the fatty acids (that’s the blue part, remember) differ.
There are two main types of fatty acids: saturated and unsaturated. (This is the same as the saturated and unsaturated fats that you hear about from dieticians!)
Saturated fatty acids have a straightforward zig-zag in their structure. The common ones we use in soap-making are lauric acid, myristic acid, palmitic acid and stearic acid, shown below.
This means that when they stack together neatly at a molecular level both before and after saponification, forming harder soaps (and harder blockages in your arteries, if you’re eating them).
Soaps made from saturated fatty acids are also more effective at cleaning – however, this means that they strip more natural oil away from your skin as well.
 |
| Click image to view larger version |
Unsaturated fatty acids have kinks in their structure, due to there being double bonds (the bits where the zig zag becomes two parallel lines).
Common unsaturated fatty acids used in soap-making are oleic acid, linoleic acid, alpha- and gamma-linolenic acid (these are also known as omega fatty acids – again, something you may have come across before in the context of nutrition), and ricinoleic acid. Because of their kinky shape, they don’t stack neatly at a molecular level and can slide around with lots of gaps, which means you end up with softer soap bars (and they don’t clog arteries if you eat them).
Soaps made from unsaturated fatty acids are less efficient at cleaning and are therefore gentler on the skin.
As well as the hardness of your soap and its cleansing powers, the amount of each saponified fatty acid in the final soap will also affect how the lather behaves. Generally, saturated fatty acids will give you a creamy, stable lather, while unsaturated fatty acids will result in a fluffy but unstable lather.
One notable exception though is ricinoleic acid (found in castor oil), which is unsaturated but gives a rich, fluffy lather that’s quite stable too. Unsaturated fatty acids also tend to go rancid more easily, as the double bond can react.
(Side note: animal and plant fats and oils are triglycerides – mineral oil and other oils derived from petroleum, on the other hand, aren’t triglycerides, so it’s impossible to make soap from them.)
You can also easily look up the fatty acid profiles of common fats and oils – they’ll differ for each batch of oil, so they’re really ballpark figures. Here are the three oils I’ll be using in the project (info from this amazing soap calculator):
| Oil | Coconut | Olive | Castor |
|---|---|---|---|
| Lauric | 48% | – | – |
| Myristic | 19% | – | – |
| Palmitic | 9% | 14% | – |
| Stearic | 3% | 3% | – |
| Oleic | 8% | 69% | 4% |
| Linoleic | 2% | 12% | 4% |
| Linolenic | – | 1% | – |
| Ricinoleic | – | – | 90% |
| Other | 6% capric acid (saturated C10) |
– | – |
Strong Base
The bases used for soapmaking have to contain hydroxide – that’s the bit that acts to break up the fat or oil into glycerin and soap. Sodium hydroxide and potassium hydroxide are the 2 most commonly used bases for saponification.
Sodium hydroxide (also known as lye or caustic soda) is most commonly used, and results in a hard bar. Potassium hydroxide results in a soft bar, and is usually used for making liquid soap.
The reason for the difference is that the sodium ion is a bit smaller than the potassium ion – it interferes less with the stacking of the soap molecules at a molecular level, and just like with saturated vs. unsaturated fatty acids above, the more efficient the stacking, the harder the resulting soap.
Safety note: Strong bases are rather nasty things to play with – just like strong acids, they’ll burn your skin right off. Remember the scene from Fight Club? It’s not just artistic license – you will end up with a permanent scar!
I’ll go more into the safety considerations for soap making in the next post.
Proportions
In the reaction diagram above, you’ll notice that you need 3 base particles to react with one fat or oil particle. Molecules are ridiculously tiny, so we can’t sit and count out the exact number we need to mix in our saucepan.
Those of you who have studied chemistry will know that there’s a method for calculating the ratios of components, but fats and oils tend to contain mixtures of fatty acids rather than a single sort of molecule, so it’s not a straightforward task!
Luckily, there are lots of soap calculators and saponification tables online with preprogrammed numbers that can do the dirty work for us – here are a few.
(If you use a particularly advanced soap calculator, it will also calculate the predicted properties of the soap made from whatever mixture of fats and oils you’ve chosen, just from the %s of each fatty acid, which is really nifty.)
These calculators let us work out what the perfect proportions would be, but remember that we’re not using super precise scientific instruments – we’re using kitchen scales, which will weigh quite a few molecules off (and by quite a few, I mean in the region of 2,500,000,000,000,000,000,000 – that’s the number of NaOH particles in a measly gram).
If we don’t have enough base, there’ll be too much fat/oil left over at the end – slapping grease on your skin doesn’t sound very cleansing! On the other hand, if we don’t have enough fat/oil, we’ll have strong base left over at the end in the soap bar – ouch!
The way we play it safe is by superfatting, which means adding a bit less hydroxide than we need – enough to be safe, but not so much that the soap ends up too greasy. This is also called a lye discount, and is usually around 5-8%.
Glycerin
This is the product that’s the same in all saponification reactions. Glycerin is a humectant moisturiser, which means it draws water to the skin to add moisture (it’s the stuff that makes this DIY nail polish remover so nourishing!). However, this also means it attracts water to your final bar of soap, making it turn to mush if you’re not careful.
Commercially mass produced soaps usually remove a lot of the glycerin to get around this issue, and some handmade soaps do too (using a process called “salting out”), but this is a bit more advanced than we need for this project.
Summary
- Soaps are surfactants, which means they dissolve in water and oils and can clean.
- Soapmaking involves reacting fats/oils with a strong hydroxide base, to form glycerin and soap (salts of fatty acids).
- Fat/oil molecules (triglycerides) are made up of glycerin chemically attached to 3 fatty acids.
- The specific fatty acids in the fats/oils you’re reacting will determine the properties of your final bar of soap.
- The strong hydroxide base you’ll be using to make a bar of soap will probably be sodium hydroxide, which has a high pH
- To calculate how much of each chemical you need in your reaction, you’ll need to use a soap calculator or saponification table.
- You’ll want to have a little excess fat/oil (5-8%) in your recipe, because being a tad greasy (moisturised) is better than burning your skin off! This is called superfatting.
That’s the chemistry behind soapmaking in a (rather large) nutshell. But how do we go from this to, well… actually having a bar of soap to use on your bod?
Part 2 will be all about the process – see you then!


This was great reading. I’m looking forward to the next installment! I’ve always been wary of working with acids and bases in the lab (I did cell and molecular biology, so it was minimal) but I think the pull of making my own soap might balance that out.
It’s not too bad if you’re prepared for it! With proper precautions it’s really quite safe 🙂
i always thought the chemistry behind soap was so interesting! out of my favorite topics in chem in school 🙂
It was one of my favourites too! I remember taking turns to stir the soap mixture in class 🙂
Hello
Great blog and explainations. I know this post is from 2014 but I was wondering if I can get some advice on how to make something like this https://www.benefitcosmetics.com/uk/en-gb/product/foamingly-clean-facial-wash
You can click to see ingredients. It looks like a liquid soap with additional surfactant and an emuslifier
This is an excellent article.. I enjoyed every minute of reading and taking down notes. Thank you very much for the work.